
Removal of Interior Joinery and Paneling
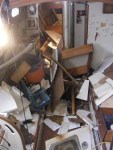
As I moved further along in the removal of the ballast the source of the good ships bad odor was located. Asphalt tar has been used to moisture proof much of the below water interior steel plating, painted on 3/16″ to 1/4″ thick in some places, never drying, just oozing about. The good news was/is that the steel is in “like new” condition, the bad news is that I had a real mess to clean up. Solvents wouldn’t touch it, it couldn’t be sanded, or scraped with a paint scraper, and the farther i followed it, the further it lead behind cabinets and wall panels. This type of product is a known carcinogen and there’s no way that knowing this i can continue to expose myself, or my family to it’s off-gassing. So out the interior came, all of it, cabinets, wall paneling, electrical, plumbing, 500 lb engine.
-
- Sick to my stomach, oh my love, my sweet, you are ill, i must cure you
-

- Amidst the rubble
-

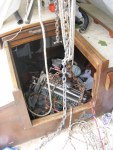
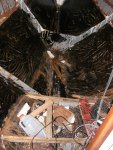
- Forepeak
-

- Forepeak down and dirty
-
- Our comes the ice box (refridgerator)
-

- Out comes the loo
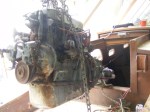
Engine Removal
As noted on the crane page, the crane was designed with the removal of this engine in mind. It would have to lift 500 lbs of engine and transmission from a height of 16 ft, lifting it 8 feet out of the cabin and then lowering it 14 ft to the ground. I removed the mounting bolts, all wiring, the shaft coupling bolts, attached the 4:1 block and tackle and pulled with all my might. I managed to budge it but just. Next I added the 350 lbs of lead counter weights to the crane (see crane page under Backyard Boatyard) and then the chain “come-a-long.” Out it came, bit by bit, and then as soon as it cleared the companionway, lowered onto the ground. I breathed a sigh of relief the minute it was over the gunwale.
-
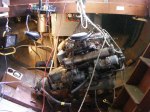
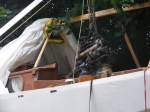
- Pulled forward off it’s mounts by a 4:1 block and tackle the engine hangs by the chain hoist and a back up line… 90 deg from mounting pos.
-
- Up through the companion way
-
- Engine on deck
-
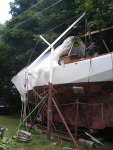
- Crane at work
-

- Ready for a new home
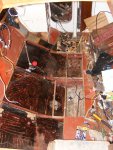
Tar Removal
The clearing of the entire ships interior now revealed the massive amount of asphalt tar that covered much of the steel plating below the water. As mentioned earlier it did a great job of preserving the steel and has adhere marvelously to the paint underneath.When solvents and abrasives wouldn’t remove it i found success in heating the tar with an electric heat gun, and then peeling it forward with a 2″ chisel. (Wearing a respirator and with a powerful fan in the forward hatch.) At first only a 6 or 8″ run can be made at once but as the plate warms up you can continue to climb up a plate shaving a 1″ slice off at a time for say 12″ to 16.” This removes the bulk of the tar leaving the original red-oxide paint showing through a remaining tar residue. I welded up a scraping bracket with a sort of blade to pull the cooling tar off the chisel. It scrapes off with a molasses type consistency and with in minutes is like a hard toffee and can be peeled off on to the board in which this scraping blade is attached. In addition to the remaining tar residue tar also remains and/or is difficult to remove from the corners created by the transverse frames and the longitudinal stringers.
I have removed the bulk of the tar on all panels but have the mentioned residue and corners to attack again. I hope to tackle the residue with a solvent (kerosene, tuluol) and scotch-brite pad combination and as the weather gets colder attack the corner with wire wheels on angle grinders, hoping that the tar becomes more brittle. (updated underneath gallery)
There were 14 sections of plate to clear, to date (residue and some corners left) they have taken 2 hours each for a total of 28 hours completed between the hours of 10 and midnight weekday evenings.
-
- A few nights into tar removal, the starboard floor panels are still in place in this shot
-

- Chisle following the heat gun
-

- This is the chisle cleaning plate (left) and paneling/tar soup on the right
-

- Looking aft, the entire cabin sole (floor) removed, a new ladder was welded up for use during the refit
-

- Forepeak Before with paneling bonded to tar
-
- Forepeak after, looks great eh!
Two solvents were tested on the remaining residue. OEM Degreaser and some really, really crudy kerosene (crudy by cook stove requirements). Night one i tried the OEM degreaser and was very pleased with it’s results, however on night two the poor kerosene tested just as well at half the price or less. The OEM is not intended for this use.
-

- ten ’till one
-

- a few panels in with the kerosene, corners still holding strong the bastards
-

- cleaning up, a few more done
-

- as the first image was labeled, ten ’till one
