Coachhouse

With the cabin trunk rebeded it was time to look at the coachhouse (cabin) roof. The original construction consisted of two layers of 1/4″ spruce ply screwed to the 1×2 oak frames. That sheathing was then sealed with a layer of canvas saturated in carpenters glue.

The state of the original roof was fair but felt somewhat soft underfoot and I wanted to inspect.

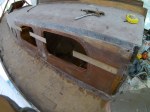
The original roof was painstakingly removed and used as patterns. I found that the two layers of spruce ply had no adhesive laminating them together. The original 36 plated screws had corroded badly, and water intrusion was obvious in the trunk-roof joint


The new roof consists of 2 layers of 6mm marine plywood laminated together, and firmly cemented to the cabin trunk, with thickened West System epoxy. The two layers were then sheathed in a layer of 10 oz fibreglass cloth set in epoxy once again. The roof was then faired with subsequent coats of West System. 132 stainless screws fasten each layer to one an other, and to the oak frames and mast step.

The forehatch aperture was prepared for the new plate aluminum hatch.


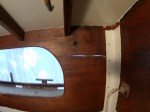
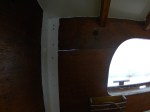
A source of some aggravating leaks had been the seam in the cabin trunk where it reaches its tallest. I ruled out injecting epoxy and decided to route a slot along the length of the seam 5/16 deep, pack it with thickened epoxy and a mahogany strip, to be sanded flush. Here are some process pictures.
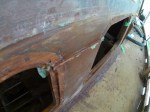
Posted in Uncategorized | Leave a comment

Cabin Trunk Removal and ReBed

As this refit moved along I became concerned with the deck to cabin trunk joint, it’s seal and its strength. The decision was made to hoist the Mahogany cabin trunk up off the steel deck, clean, abrade and seal the mating surfaces and re-bed. The cabin top had been of marine plywood and canvas, and is due for replacement or at very least repair and fiberglass, these two jobs seemed to compliment each other thought I did hope to be working on the interior of the vessel this season.

The combination of steel and wood is a poor one, inviting both rust and rot to a party. It took some work to pry, jack and will the cabin trunk off the deck as it had not been removed since construction. The cabin is held to the steel structure with 4 steel corner posts lagged to cabin trunk and with 8 through bolts (1/2″) and 118 screws piercing the 2″ steel flange that borders the cabin trunk aperture. 112 screws had to be drilled out for removal. Those screws were then removed, there holes over drilled and filled with epoxy to accept the new fastener.

The original bedding compound was dried and crumbling, thankfully not too much rot or rust was found though it was present. The steel under the trunk and 5″ out was ground to white metal and coated with three coats of Amerlock. The bottom edge of the 1 1/2″ cabin trunk was sanded clean and the given three coats of West System leading 1″ up both inside and outside edges. The deck will be blasted and painted when the entire boat is done, the cabin and the new joint will be masked off, allowing the blasting and new paint to over lap this new portion.

After much debate I opted to rebed with 8 caulking tubes LifeCaulk a polysulphide from Boat Life. With the slow dispensing tubes I soon opted to cut the end of the tube and use the caulking gun to dispense huge smears onto a trowel. I would buy the trowel bucket next time. I refastened the though bolts squashing out 25% of the bedding compound but filling any and all areas of the joint. I then refastened the trunk with 178 stainless screws.

This shows the new joint, cabin sides and deck will be resurfaced as mentioned.

TASKS IN A REFIT SEEM TO SELDOM IF EVER HAPPEN IN A SENSIBLE ORDER!


Posted in Uncategorized | Leave a comment

Aux Engine Update – Volvo MD2

Our new 50 year old lifeboat diesel is all but ready for installation.

I have added a fresh water cooling circuit to replace the raw water cooling. This system integrates a copper-nickle heat exchanger with an aluminum header tank, two new water pumps and a welded 316 stainless exhaust mixer. The fuel system now includes dual Racor 215 fuel filters at 10 and 2 mircon respectively

The engine has had the exhaust manifold disassembled and cleaned, injectors replaced with new. Spares now include a vast inventory for extended cruising though I keep my eyes open for more all the time

Everything has been painted and after some final assembly it will be hoisted aboard with our small manual crane.

Posted in Uncategorized | Leave a comment

Blocks – 22 blocks, of Delrin and Aluminum

Upon return from our Atlantic voyage we were in need of blocks. We had a complete kit of wooden cheeked plastic sheaved blocks in 2007. 10 years later each one is badly wounded. Many had the injection molded sheave buckle in the narrowed mid-section, sending broken sheave into the cheek and jamming the whole setup.

I want to go sailing, and as beautiful as the wooden blocks were, they require more time to construct and more time to maintain. I am a metal worker, so I fabricated 22 blocks with 1/4″ aluminum cheeks, solid/turned delrin sheaves 2 3/4″ in diameter, the sheave has a oil-lite bronze bearing pressed in, and the pins are 3/8 stainless steel bolts, spaced with 3/8 ID / 1/2 OD ss tube.

I purchased a metal lathe in the summer of 2016, and frankly I wish I had done so the day I finished my boat-shop. It’s been invaluable in fabricated bushing, bearings, repairs to windlass, rigging, etc, etc.

Sheaves

The delrin was sliced from a 36″ x 3″ 2 7/8 rod using a table saw with appropriate blade. It was then placed in lathe chuck and faced both sides. When this was complete i centre drilled and faced the outside radius. I then enlarged centre hole for press fit to lathe mandrel, Grooving of each sheave commenced at this point.

I borrowed some radius gauges and made myself a set of (lathe) cutters for the sheave grooves. I tried a single cutter but the diameter of 5/8 was often too much for my small lathe. So this was split into 2 half diameter cutters.

Despite the firm press fit for the mandrel, many of the sheave blanks continue to slip when any real cutter pressure was applied.

Block Cheeks, Pins and Axles.

I cut the aluminum cheeks from 3″ x 1/4″ flat bar, cut them to shape on a bandsaw, sanded all edges on belt sander, and them took them to a friend with a vibra-polisher to tumble them.


Posted in Uncategorized | Leave a comment

Lofrans Windlass Rebuild

I completely destroyed my seized Lofrans Manual Royal. Don’t use your windlass as a samson post, don’t let the vessel ride to it, don’t let salt fill it. I did this.. so now i have a project. Where the main gear/drive passed through the cast housing, as well as where the chain pawl’s gear passed through the cap casting has completely seized. I tried heat, I tried more heat ( propane and ox-acetaylene) I loaded a three jaw puller for one week with penetrating lubricant.  I tried a shop press after many other efforts and cracked the main casting.

I prepped and TIG welded the original casting back together, bored out the housing surfaces. I’ve turned new housings, from aluminum and TIG welded them into the original casting. This was followed by the turning of new UHMW shaft bearings, thrust bearings, and end plates. I’ll try to reference this to my Lofrans manual and part numbers at some point to perhaps give someone else some ideas. If you need to know, contact me.

More assembly shots etc to follow

Posted in Uncategorized | Leave a comment

Eleanor Moves North 36″

The spring work began with a widening of the drive in which Eleanor Tarr’s refit is taking place. In order to ease  the vessels departure on a hydraulic trailer, it was necessary to center the the cradle with the  new drive. A move of 36″ north was required.

The cradle was jacked and blocked in order to pass 16′ 6×6 timbers underneath. 3 such timbers spread the load underneath. The load was then lowered on to timbers with a small sheet of UHMW plastic (1/4″) sandwiched between steel cradle and timber.

The Timber was then well greased. End caps were fabricated for the end of the 6×6  timbers. Chain come-a-longs were then attached to these end caps and to slings around the cradle.

This slideshow requires JavaScript.

Posted in Uncategorized | Leave a comment

Anchor Sprit

This small extension of our bow is considerably shorter, and stronger than our previous anchor roller/platform. In addition, there is a chain plate to accept a masthead forestay (bare wire) or a spinnaker tack.

I rented some scaffolding to make this project comfortable. As one might imagine, the sprit being straight and true was of utmost importance. The scaffold made this measuring and “eye-balling” a practical affair.


This slideshow requires JavaScript.

This summer we added a small metal lathe to the shop tools. The need for construction of rudder bearings, sheet rollers and other things round necessitated the purchase of an Atlas 618. UHMW rollers were turned to accommodate the 3/8 chain as well as the shank of a Rocna 15. Cheek blocks will then box the rollers in, and attach the two roller shafts to one another.

Rollers


Posted in Uncategorized | Leave a comment

Diesel – 15 Gallon Day Tank

Tig welded diesel tank. Mild steel, coated inside and out with epoxy paint. This is a 15 gallon tank which sits level with the engine. The 25 gallon keel tank will feed this tank via 12v pump. The side of the tank features brackets to attach an aluminum plate which holds the 2 stage Racor fuel filtering system.

Posted in Uncategorized | Leave a comment

Rudder Rehabilitation

As mentioned in an earlier post about rudder heals and bearings, the rudder stock as well as the rudder tube suffered corrosion from contact with a bronze bushing. The surface of the rudder stock was left pitted like a lunar surface.

Using ultrasound and calipers it was determined that sound stock measured at a minimum of 1.39″ in all but a few pits. The decision was made to repair and fill each of the dimples, grinding each back to the level of a straight edge placed across the stock

A gantry type of lift was quickly fabricated in order to provide easy rotation of the 300 lb + rudder. It will be used to service the engine and construct engine mounting system as well.

Below is the first phase of filling. Ugly but a significant betterment.  A piece of steel machined to exactly 1.55 ID is used to check for fit after welds are ground to flush line. If the “donut” catches at a point a file can be used to bring that point down. A few more passes and then a surface buff will catch-up the main stock with the heel which has had three passes.  It will look fairly fair and smooth by the time it’s finnished.

Our Volvo Penta MD2 has it’s new starter mounted on fabricated brackets incorporating a alternator bracket as well. Neither were originally fitted on this hand cranked surplus lifeboat engine.

DSCF2009


Posted in Uncategorized | Leave a comment

Family’s picnic vessel

We’ve wet our whistle once again. We can handily tow this 16′ wayfarer around with our toyota corolla. It takes a half hour to rig completely and we’re off. We’d never sailed the lakes in the our region and it seemed this was the best way to do it. And a great way to take small out under sail. He (small) hates the first 5 minutes and then he likes it alright. chips help. However he has fallen asleep while underway. It’s a quick, smooth vessel, handles beautifully.

Posted in Uncategorized | Leave a comment